A Beginner’s Journey: Quilting Parts 1-3
I’m over just talking about it. I’m going to sew….even if it’s not Grandma Jeanie’s level & feels like I’m cheating by doing Big Stitches and Patchy Patchwork instead of traditional quilting! https://shop.shinyhappyworld.com/collections/pieced-quilt-patterns/products/big-stitches-and-patchy-patchwork
My sister, Sandy (Sissy), asked that I document my progress step-by-step as she is a novice as well & would one day like to learn. This is me fulfilling her request the best I can. 😉
*FYI: These will be written informally as instructions to my daughter, sister, and GG's. There WILL be multiple spelling & grammatical errors in anything ever produced by me.
I decided my first project would be:
- Small! I want to be able to finish something I’m proud of to gain momentum so I can move to more complex goal projects.
- Something I can hold in my lap & sew without a frame.
- Something that will teach the quilting process from start to finish.
- Something functional & beautiful that represents a part of me & Grandma in some way.
Drumrolllllll…….I’m making pot holders and a trivet/oversized pot holder for my cast iron stovetop rectangular griddle. May sound boring to some, but I’m tickled pink. ;)
Today I purchased size 8 embroidery needles from Hobby Lobby along with 12 wgt 100% cotton thread. (in the embroidery section NOT the quilting)
Progress made thus far:
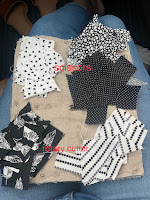
- fabrics decided upon & cut
- Quilt sandwich constructed & pinned with size 1 curved safety pins.
- Cut fabric in pieces. Only rules were no circles and small enough that at least 2 patches will fit per quadrant.
- Started prepping patches by pressing all the way around to create clean edges and keep fabric raveling to a minimum. (Big Stitches & Patchy Patchwork paid lesson {$24.99} explains how to do this)
- Started arranging patches.

Tomorrow I’ll pick back up prepping and positioning on the other pot holder (PH2) and trivet (TRT). I may glue down my patches on pot holder 1 (PH1) first so I’ll have something to sew while Cash gets his haircut and MK has physical therapy tomorrow after school. It’s a slow, but steady & satisfying process for me so far. Exactly what I hoped it would be.
*I did ATTEMPT to video for you sister. They’re long & boring with a heavy southern draw lol, but you’re welcome to them if you need help putting yourself or Madi doll to sleep. [or a sloth paced tutorial.] ;)
https://youtu.be/fNG8YdnrbDw Part 1
https://youtu.be/azPlK2DerT0 Part 2
https://youtube.com/shorts/copk57KdPK8?feature=share Part 3

Oh my land!! This is so great! What a treasure you have started. Since I can’t be there in person to follow along, this is the next best thing. I know it’s extra work for you so thank you for this gem and for sharing this journey with me!
ReplyDeleteYou're welcome! I'll probably need it myself by the time I move on to a different project. lol! One day I hope we can do it together!! xoxo
ReplyDelete